Bulk Fulfillment with Pass Manager #
Pass Manager allows approved venue partners to self-serve bulk fulfillment of pre-approved $0 event parking bookings directly from their Seller account. This eliminates the need to route requests through Digital Support for standard batch distributions.
Requirements #
- Access: Admin-level access to Pass Manager (digitalsupport@parkwhiz.com)
- Venue/Event Setup: Venue and Event listings must already exist
- Pricing: Active pricing with corresponding PAC (Pass Access Code) must be configured
- Volume Limitation: Requests over 2,000 bookings must go through Digital Support
How It Works #
The following instructions walk you through how to create and manage a new fulfillment using the Pass Manager tool. You can choose to enter bookings manually for smaller requests or upload a CSV file for larger batches. Each method allows you to label and track your fulfillments, send confirmation emails, and monitor progress in real time; all from your Seller account.
How to Access Pass Manager #
- Navigate to your Seller account.
- Select the Pass Manager tab from the top menu.
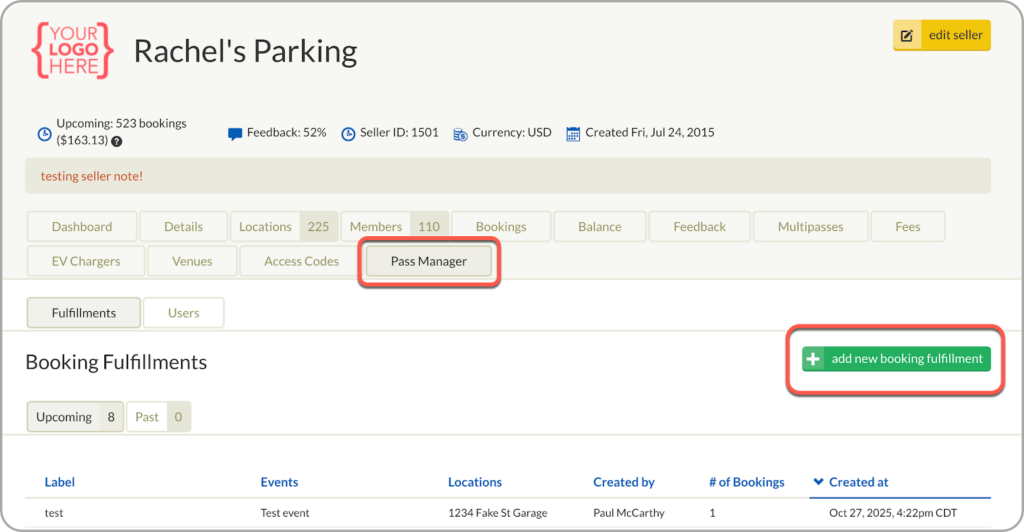
The initial Fulfillments tab displays records of both past and future fulfillment events.
Create New Booking Fulfillment #
- Click the green “add new booking fulfillment” button to initiate a new fulfillment.
- Choose your method for data input:
- Manual submission
- CSV upload
The CSV upload feature is typically the more efficient option.
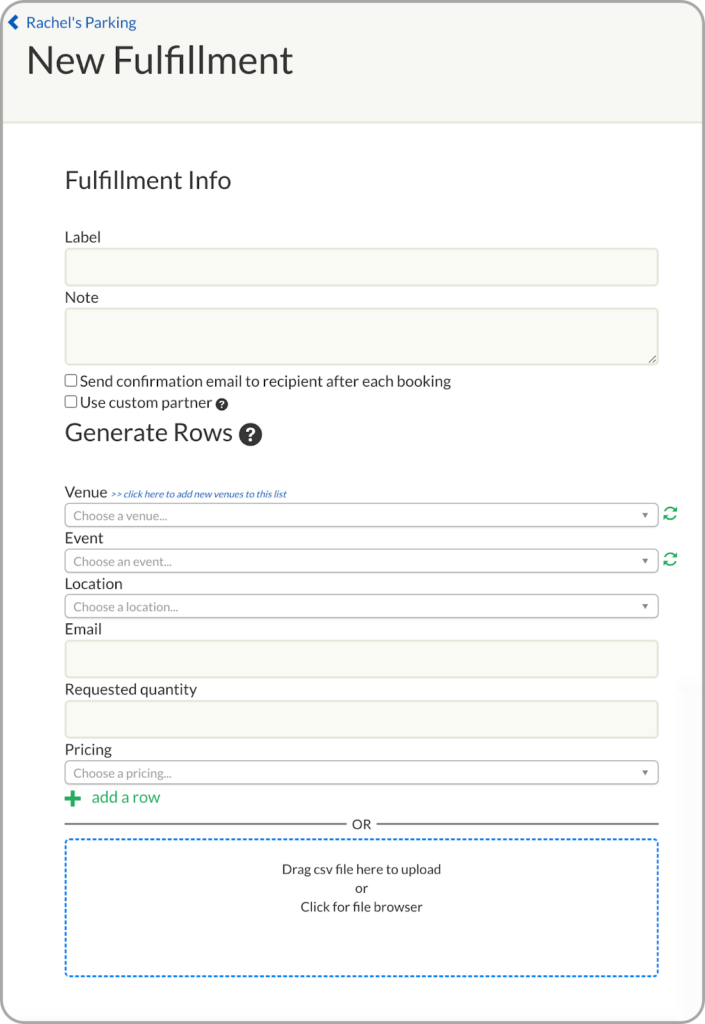
Method 1: Manual Submission #
- Label: Enter a descriptive Label for the fulfillment. (There is no required naming convention.)
- Notes (Optional): Add any optional notes in the provided field.
- Confirmation Emails: Select the option to send a booking confirmation email for each booking
- Send confirmation email to recipient after each booking
- Use custom partner: Use for custom-branded emails
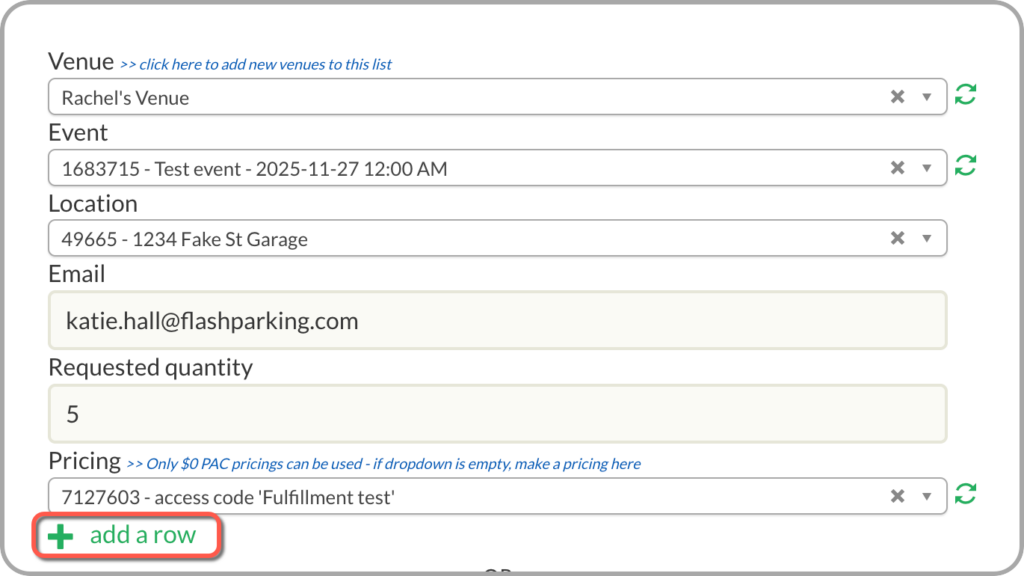
- Enter Booking Details: For each unique booking, select/enter the following information:
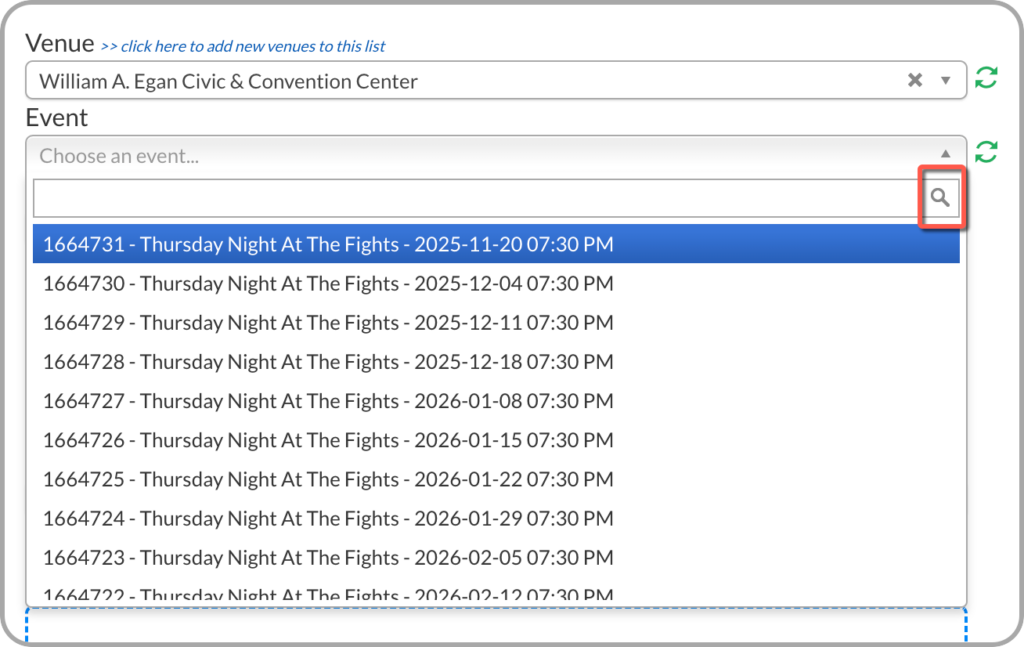
- Venue
- Event
- Location
- Email: Enter only one email per row
- Quantity: If over 2000 passes are needed, contact digitalsupport@parkwhiz.com for assistance.

5. Once this data is populated, the corresponding Pricing (with its PAC) will auto-populate.
6. Add Rows: Click “add row” and continue adding line items until all passes are accounted for.
Note
If a single recipient is receiving passes for multiple locations or events, a separate row must be added for each unique Location/Event combination.
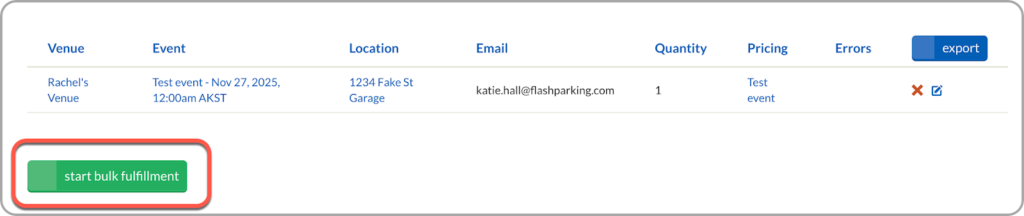
7. Once all rows are added, select the start bulk fulfillment button to send passes to recipients.
Method 2: CSV Upload #
You can also fulfill passes in bulk using a CSV upload. This method requires a specific file format, which is easiest to generate directly from the Pass Manager.
1. Generate the CSV Framework
Before adding your customers, create the structured CSV template from the Pass Manager:
- In Pass Manager, manually add at least one row for each unique Location/Event combination you plan to fulfill.
- Example: If you are fulfilling passes for three different events at one location, create three separate rows – one for each event.
- Select Export to download the CSV framework.
This ensures your file includes all required columns for each venue, location, and event.
2. Populate the CSV File
- Open the downloaded CSV in your preferred spreadsheet tool (Excel, Google Sheets, etc.).
- Add all remaining customers and their corresponding Pass Quantity.
- For each customer row, make sure the venue, location, event name, and pricing columns match the correct Location/Event combination.
- Save your completed file in CSV format.
3. Upload and Start Fulfillment
- Return to the Pass Manager fulfillment page and refresh page.
- Add a Label to identify this fulfillment batch.
- Scroll down to the CSV upload area and upload your saved CSV.
- Select Start Bulk Fulfillment to begin processing.
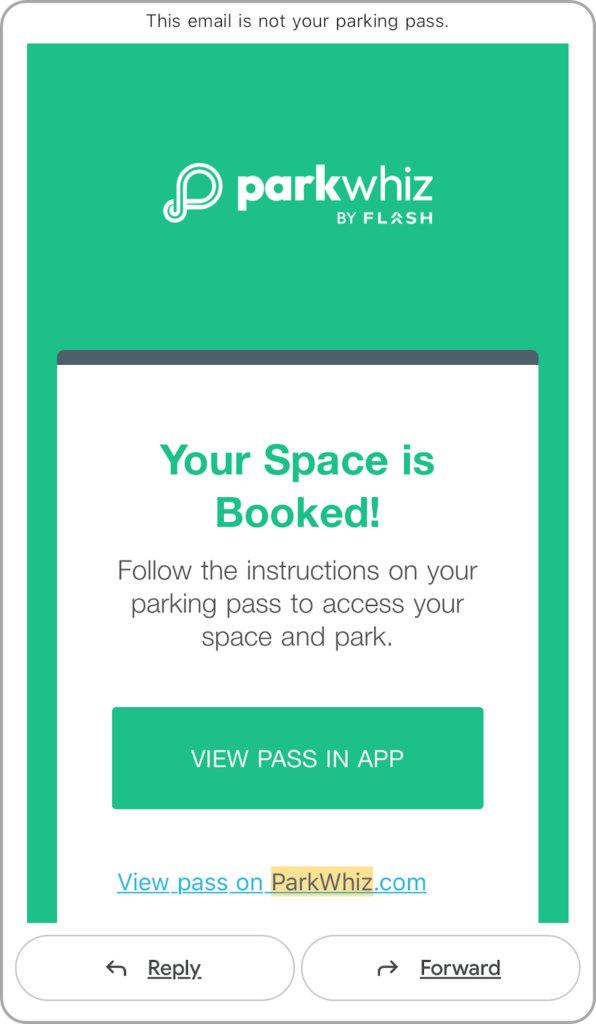
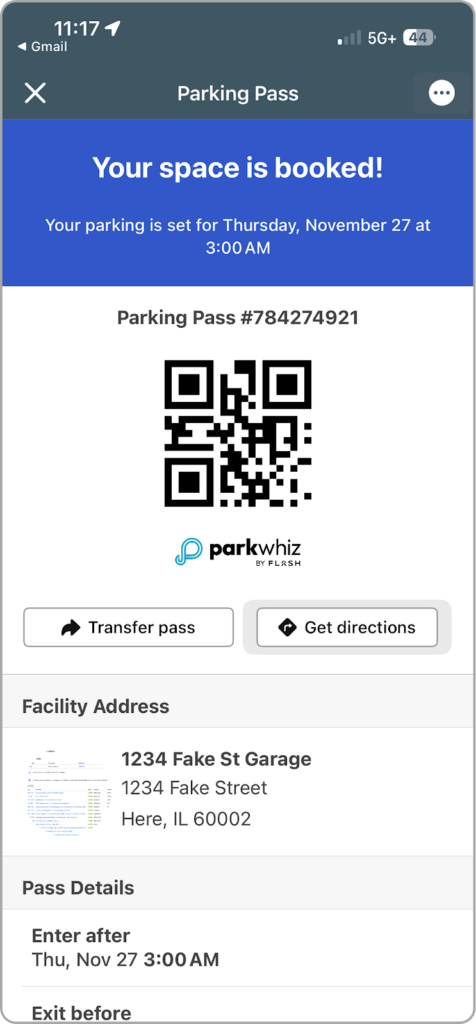
Access Parking Passes #
Recipients will receive the pass confirmation via email, and the VIEW PASS IN APP must be selected to access the Event Parking Pass.
- These email confirmation can be forward to any recipients for use.
Bulk Fulfillment with Pass Manager gives venue partners a faster, more reliable way to distribute parking passes at scale. Whether you’re managing a small group or fulfilling hundreds of bookings at once, the tool provides full visibility, precise control, and efficient delivery—all without relying on support. With the steps in this guide, you can confidently create, track, and manage your fulfillment batches from start to finish.
Package Fulfillments #
Pass Manager supports Package Fulfillments, allowing multiple events to be grouped under one package. When submitted, the system generates one pass per event included in the package (e.g., a five-event package creates five passes).
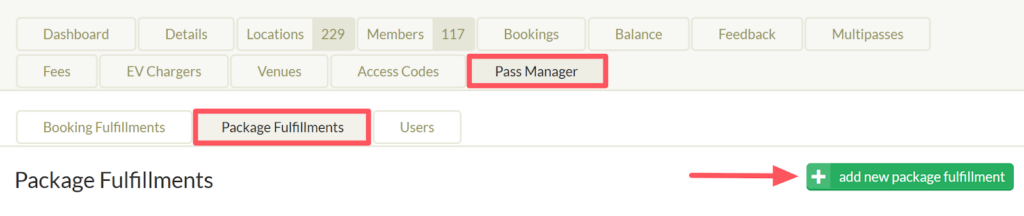
- In the Seller account, navigate to Pass Manager > Package Fulfillments
- Create New Package Fulfillment
- Click the green “add new package fulfillment” button to initiate a new fulfillment.
- Choose your method for data input:
- Manual submission
- CSV upload
The CSV upload feature is typically the more efficient option.
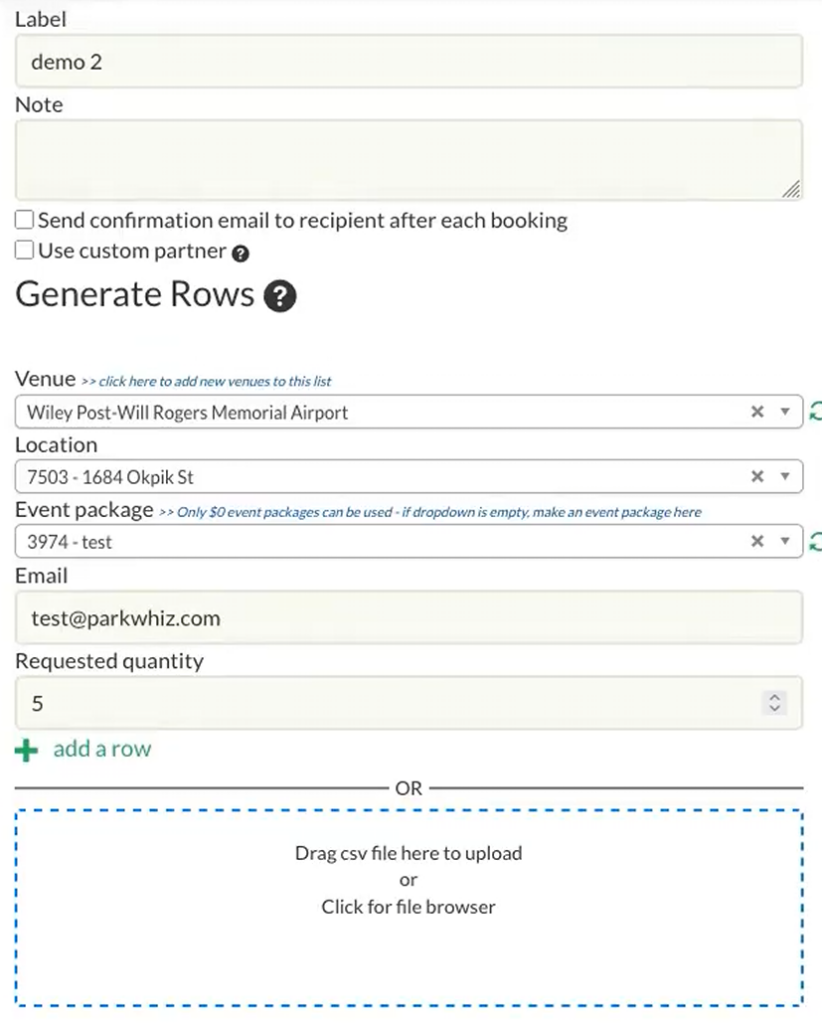
Method 1: Manual Submission #
- Label: Enter a descriptive Label for the fulfillment. (There is no required naming convention.)
- Notes (Optional): Add any optional notes in the provided field.
- Confirmation Emails: Select the option to send a booking confirmation email for each booking
- Send confirmation email to recipient after each booking
- Use custom partner: Use for custom-branded emails
- Enter Booking Details: For each unique booking, select/enter the following information:
- Venue
- Location
- Event Package
- Email: Enter only one email per row
- Quantity: If over 2000 passes are needed, contact digitalsupport@parkwhiz.com for assistance.
5. Once this data is populated, the corresponding Pricing (with its PAC) will auto-populate.
6. Add Rows: Click “add row” and continue adding line items until all passes are accounted for.
Note
If a single recipient is receiving passes for multiple locations or events, a separate row must be added for each unique Location/Event combination.

7. Once all rows are added, select the start bulk fulfillment button to send passes to recipients.

Method 2: CSV Upload #
You can also fulfill passes in bulk using a CSV upload. This method requires a specific file format, which is easiest to generate directly from the Pass Manager.
1. Generate the CSV Framework
Before adding your customers, create the structured CSV template from the Pass Manager:
- In Pass Manager, manually add at least one row for each unique Location/Event combination you plan to fulfill.
- Example: If you are fulfilling passes for three different events at one location, create three separate rows – one for each event.
- Select Export to download the CSV framework.
This ensures your file includes all required columns for each venue, location, and event.
2. Populate the CSV File
- Open the downloaded CSV in your preferred spreadsheet tool (Excel, Google Sheets, etc.).
- Add all remaining customers and their corresponding Pass Quantity.
- For each customer row, make sure the venue, location, event name, and pricing columns match the correct Location/Event combination.
- Save your completed file in CSV format.
3. Upload and Start Fulfillment
- Return to the Pass Manager fulfillment page and refresh page.
- Add a Label to identify this fulfillment batch.
- Scroll down to the CSV upload area and upload your saved CSV.
- Select Start Bulk Fulfillment to begin processing.