The Garage Log allows users to view/search records of all garage activity, sorted by parking transaction type, or search individual parker activity by barcode. The Garage Log is an action center that not only details transactions as they occur in real time but also allows Parkonect users to take instant action, including logging parkers in or out of vending gates and/or pushing fees.
Requirements #
Only the following user types can access the Garage Log in the Parkonect Admin portal:
- Super User
- Accounts Level User – Only selected monthlies and parking heads.
- Customer Administrator
- Flash Admin
- Parking Manager
- Remote Center
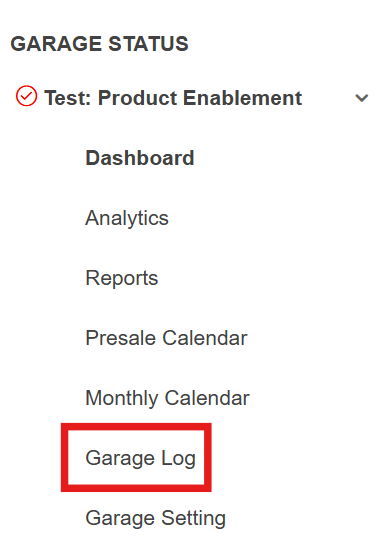
How to Access the Garage Log #
To access the Garage Log, use the Quick Links feature on the left side of the Dashboard page.
Click the desired garage’s dropdown and select the Garage Log option.
Actions #
The following are the key actions that can be taken on the Garage Log:
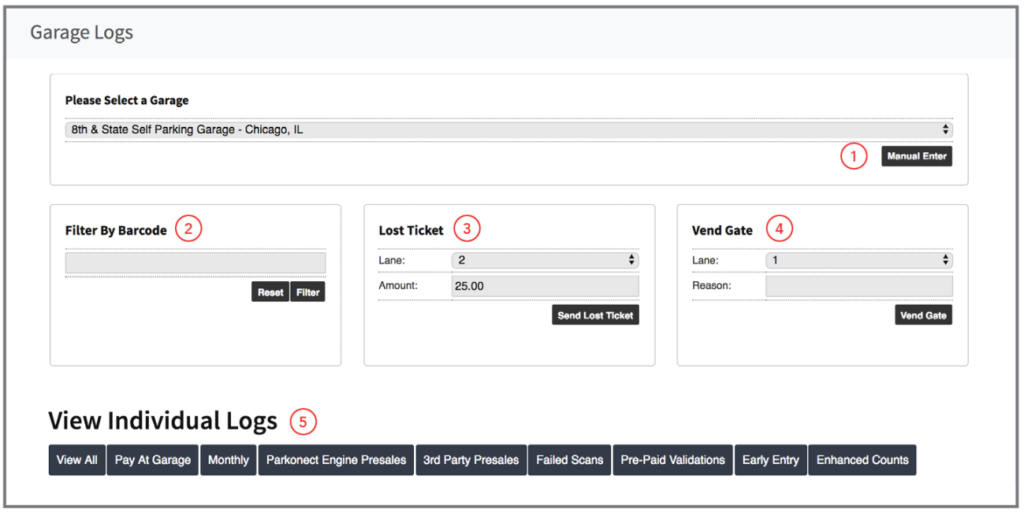
- Manual Enter: Manually log in a parker.
- Filter By Barcode: Enter all or part of a barcode or order ID to search and display the related data.
- Lost Ticket: When enabled, you may enter a custom rate and push it to any exit station at your site for instant collection. The loop must be triggered to vend once payment is processed.
- Vend Gate: When enabled, you may select a lane and vend the gate. If loop sense is active, a car must be triggering the loop for this feature to work.
- Log by Type Tabs: Sort data by type of parking transaction, as further defined below.
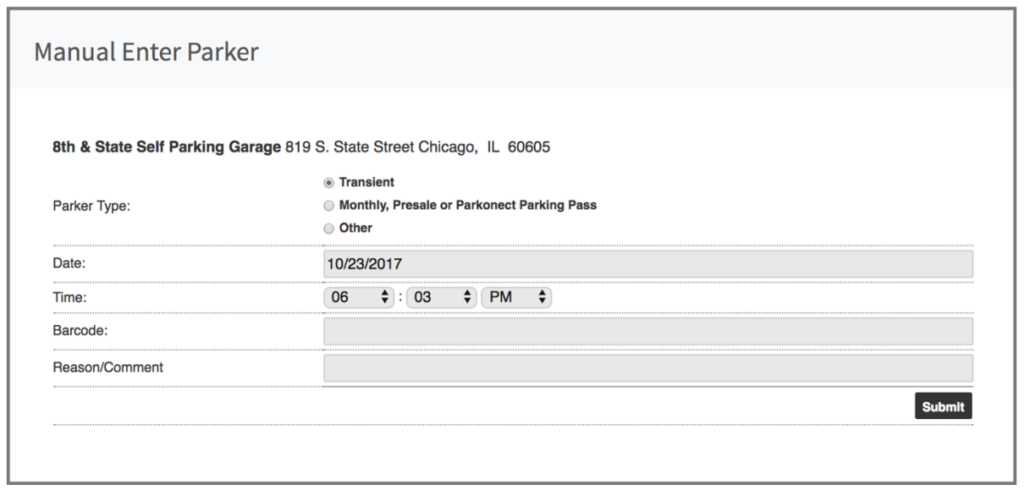
Manual Enter #
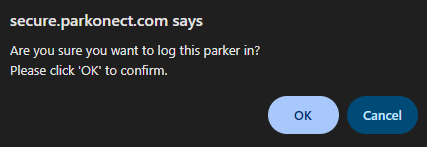
- Clicking Manual Enter at the top of the Garage Log will open a pop-up window. From this window, you can log in as a parker by defining the parker type (transient or other – where “other” includes monthly and/or presale parkers), the date and time of entry, the parker’s barcode, and a reason code.

- When manually entering monthly and presale parkers, the system will provide a list of authorized parkers based on the barcode entered.
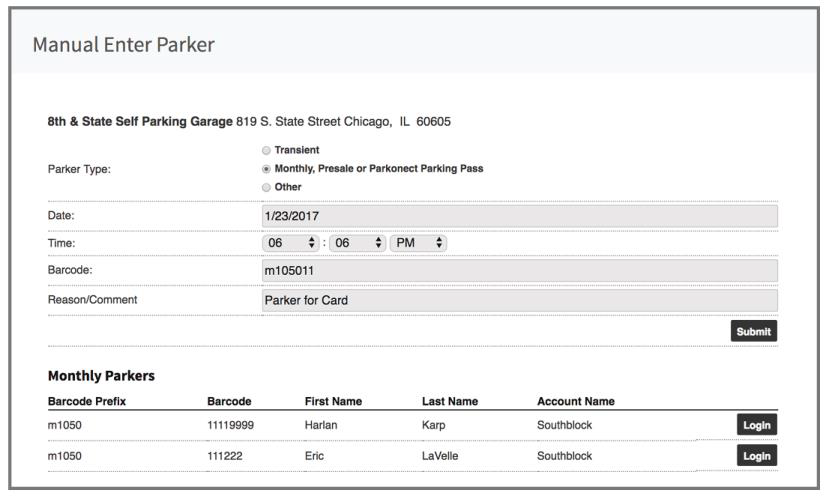
- Select the appropriate parker and click the “Login” button.
Note
You will have the option to vend a gate of your choice or proceed without a gate vend when performing this manual transaction.
Once a parker has been manually entered, they are treated the same as if they had correctly entered the garage at the time you appointed. All manual entries are listed in the Manual Logins & Logouts Report. Note that any barcode you enter must be a valid monthly parker’s barcode or part of a valid range for your garage.
Sublots #
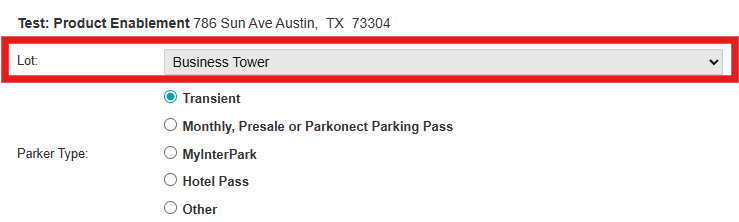
If your garage has sublots or nests, you will have to select the “lot” you want the manual transaction applied to.
Filter By Barcode #
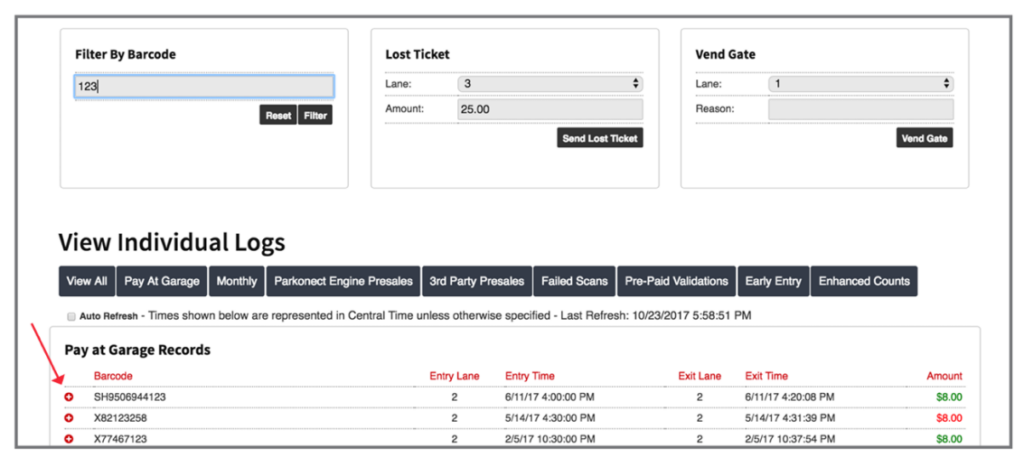
You can also navigate the Garage Lot with the “Filter By Barcode” section. Our database will return transactions (barcodes and order IDs) that match the string of numbers you entered. The plus icon (+) allows you to expand every garage record and view additional details associated with that specific barcode.
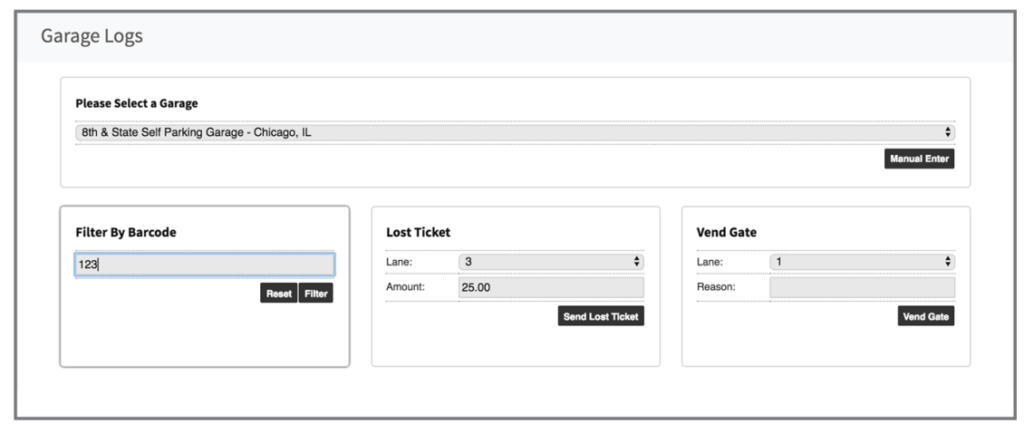
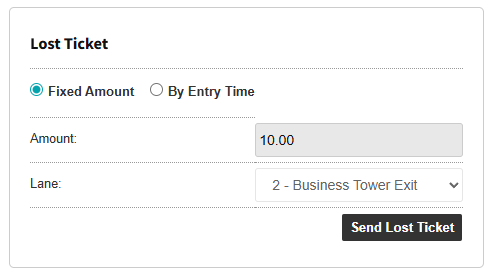
Lost Ticket #
The Lost Ticket and Vend Gate functions allow users to take action on the garage hardware directly through the Cloud portal.
When enabled, Lost Ticket allows you to push a rate to any exit lane. The default rate is set under Garage Settings but at certain garages, this rate can be manually entered as needed.
- Choose the lane and enter the rate.
- After pressing the “Send Lost Ticket” button, a new Pay-at-Garage record will be created called “Lost Ticket” and the patron will see the lost ticket rate in the garage.
- The patron will have 20 seconds to pay the lost ticket rate. Once payment is collected, the lost ticket transaction will be closed and the gate vended.
Note
Each Lost Ticket created increases the car count in the garage and therefore, if the Lost Ticket is not collected, it is important to manually log out the transaction to keep the car counts/occupancy of the garage accurate.
Lost tickets are counted as a separate line item in the vend section of the Garage Summary report, as well as captured on the garage’s Manual Log-In/Out Report.
Vend Gate #
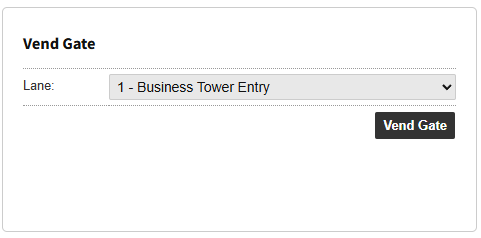
Vend Gate lets you choose a lane to remotely vend the gate. Each vend is recorded in the system and requires a reason explaining the event, as all vends through this function are captured in the Manual Log-In/Out Report. In general, if a transaction is shown on the Garage Log without a number in the “Entry Lane” or “Exit Lane” fields, it indicates that a manual action occurred.
Note
If loop sense is enabled at the lane and a car is not in the lane to trigger it, the vend gate or lost ticket function will return an error and not vend the gate.
Pay at Garage Records #
This section of the Garage Log shows all transactions that result in charges that are to be collected in the garage. This section includes:
- Transient parkers (pulled tickets).
- On-demand transactions (ParkMobile, others).
- Fees associated with early entry/overage collections.
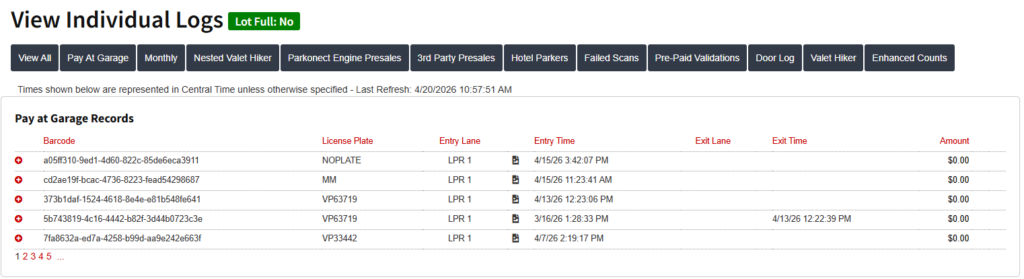
The information on this sub-log is sorted by barcode and includes the following information:
- Promo/validation code: if used, the log will show the validation number as well as a description of the validation used.
- Entry lane, date and time
- Exit lane, date and time
- Duration
- Amount: this is the amount that is due on the transaction. If collected at the garage, there will be a corresponding credit card transaction ID (“TransID”).
- Message: if the collection was successful, this will say “Approved”. Otherwise, this section will provide information if another action was performed, such as a manual log-out or the amount was collected by another mechanism (such as by 3rd party vendors). If there is no message and no TransID, it means the amount was NOT collected.
- Order ID: if the transaction corresponds to a presale, the Order ID will help in researching in the Presale Log.
- Last Scan: This shows the date and time of the last event activity in the garage for the transaction.
Transactions that have not been collected will have a “Logout” button. Click “Logout” to manually log out a parker.
Adding a License Plate #
The following user types can add a LP to a session in case LPR was not able to capture the plate or if the user wants to connect the session to one:
- Super User
- Flash Admin
- Customer Admin
- Remote User
- Garage Admin
- Parking Manager
- Users click the (+) for the session they want to add an LP to, and click the Add License Plate button.
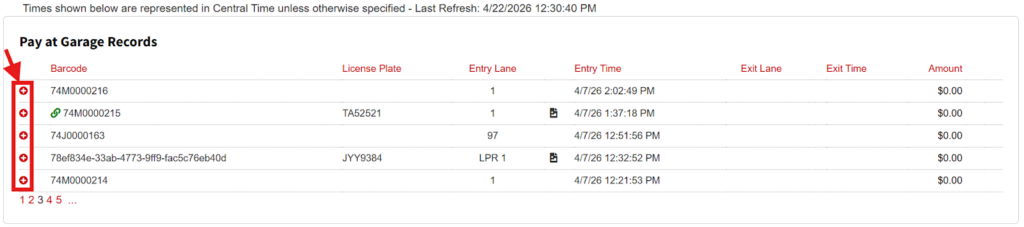
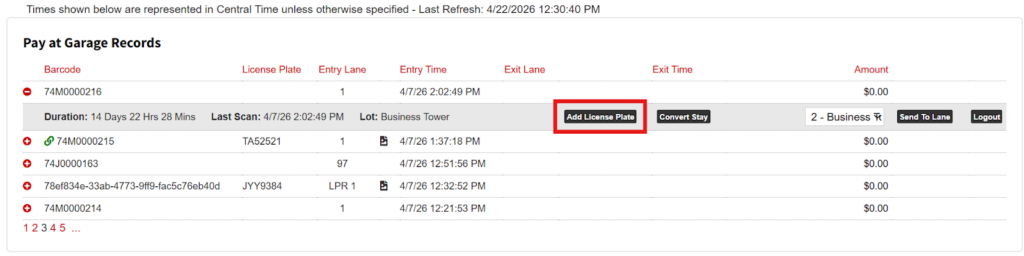
- Then enter the LP number and click the Submit button to save changes.

Monthly Tab #
The Monthly Tab displays all monthly parker activity. Entries are sorted in reverse chronological order (most recent scans first) by barcode, last name, entry lane, entry date and time, exit lane, exit date and time, the parker’s activity status, and the duration of their stay. The plus icon (+) allows you to expand every garage record and view additional details associated with that specific barcode.
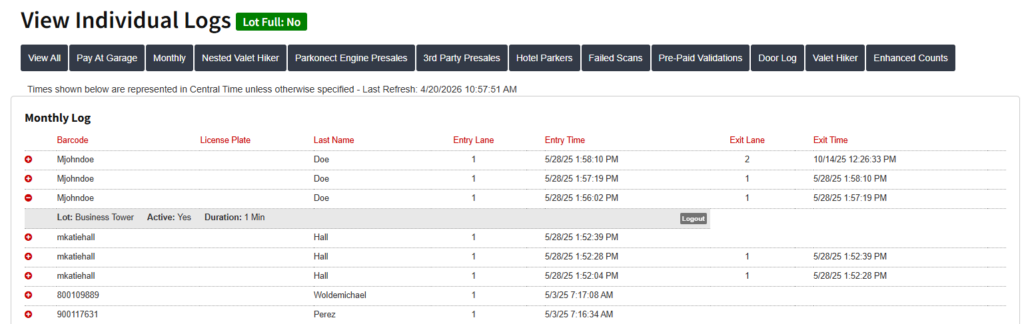
Click the “Logout” button when selecting a monthly entry to manually log out a monthly parker.
3rd Party Presales Tab #
The 3rd Party Presales Tab displays all online presale garage activity. The plus icon (+) allows you to expand every garage record and view additional details associated with that specific barcode.
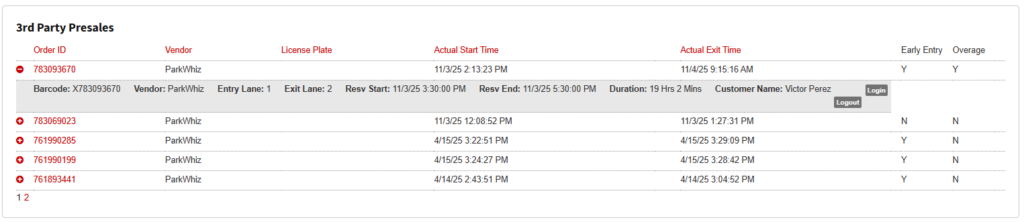
Entries are sorted by barcode in reverse chronological order, and each line item includes:
- Barcode.
- Vendor.
- Order ID.
- Purchased entry and exit date: this is the reservation time they purchased.
- Actual entry lane, date and time, and actual exit lane, date and time.
- Overstay or Early Entry: If early entry or overage charges apply to a presale parker, the appropriate field will say “Yes” and a corresponding ticket will also appear in the Pay at Garage records using the same barcode.
- Duration.
Click “Logout” to manually log out an online parker. To view more details about a presale parker, go to the Presale Log and use the order ID to search for the transaction.
There is also a tab for Parkonect Engine Presales. This is the same as the above, just for reservations made using the Parkonect reservation system instead of external 3rd party solutions.
Parking Passes #
The Parking Passes section shows a log for recently used parking passes along with their validation code, ID, promo code, creation date and if it was cancelled or not.

Alternatively, users can select to log in a parker by pressing the Login button at the right side of the parking pass.
Door Logs #
This section of the Garage Logs shows information for pedestrian access (if doors have been configured as a lane), showing the barcode type for the pedestrian who used said door, and the status for the interaction.

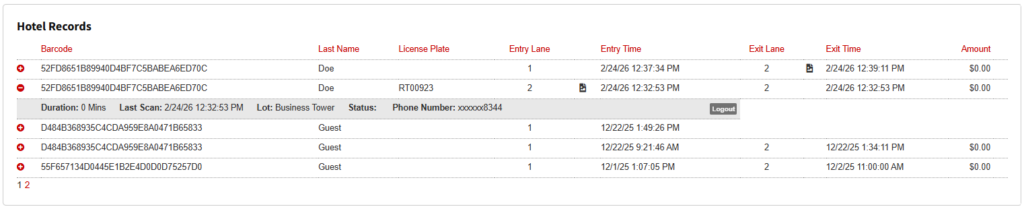
Hotel Records #
Specific for hotel users if the garage has been configured with a Hotel. Management for this section works just like the monthly log section for hotel parkers.
Failed Scans Tab #
The Failed Scans Tab displays all recently failed scans in the garage. The plus icon (+) allows you to expand every garage record and view additional details associated with that specific barcode.

If secondary credentials are used at exit, they will also be shown in this tab.
Example: a monthly parker uses their primary credential to enter, and a secondary credential to exit. The secondary credential will be shown as a failed scan.

Entries are listed in reverse chronological order and sorted by barcode associated with the scan, whether a promo code was applied, the rate displayed in lane (-1 indicates no rate was displayed), lane number, event time, order ID, and a reason code.
Use the reason codes as a first-line troubleshooting tool for your Parkonect system.
Common reason codes are as follows:
- Invalid Barcode: This barcode does not belong to a valid monthly parker or range for transient parkers, and is not a valid online presale. It may also belong to a valid transient range and have been used already.
- Invalid Monthly Parker: This parker is not a valid monthly parker and may have been deactivated. Sometimes, barcodes from other sources (receipts, tags, etc.) display this message when scanned.
- Invalid Track Data: Commonly indicates a bad credit card swipe. Uncommonly, this may indicate an error with the credit card reader or gateway.
- Rate Lookup Error: This parker may have already left or never entered. Online parkers triggering this error may have mistakenly pulled a ticket upon entry. Accidental double scans may trigger this.
- Vehicle Not Present: Loop sense is active but not triggered.
- Third-Party Barcode Already Checked-In or Invalid Time Range: This parker may have already entered the garage and is attempting to enter again, violating passback. Alternatively, this parker may be attempting to enter outside
Enhanced Counts Tab #
The Enhanced Counts Tab displays the garage’s occupancy in real-time, categorized by parker type, and includes (as part of the live count) online presales scheduled to arrive within the next two hours. Any red text indicates linked data, displaying a breakdown of all parkers in a category.
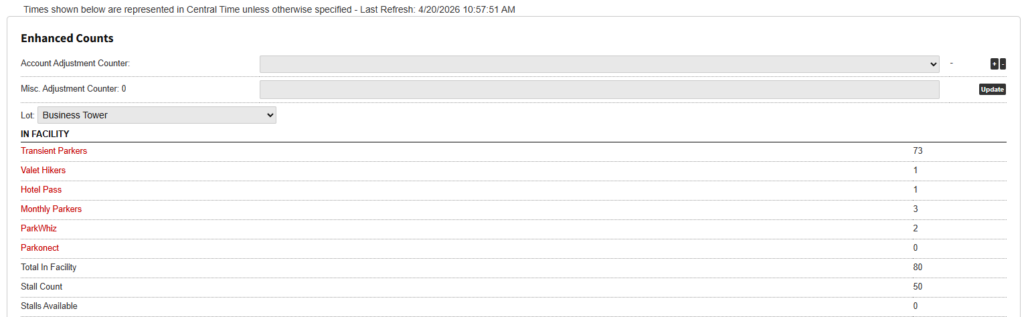
Manual adjustments to the count can be made either by a general adjustment or by applying adjustments to monthly accounts. This can be done by pulling down the desired account and clicking the “+/-” buttons displayed at the top of the page.
Early Entry Tab #
The Early Entry Tab is an advanced function for manually applying early entry fees to presale parkers.
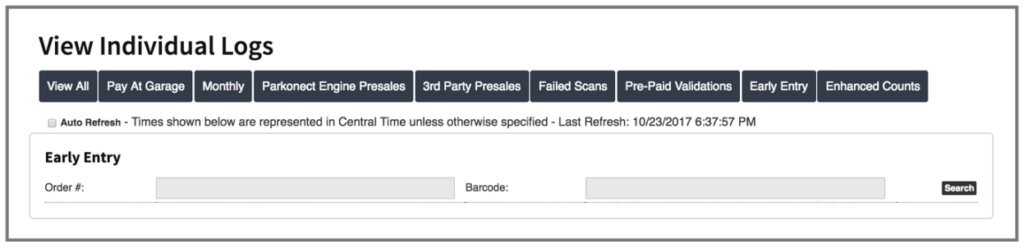
Search by barcode or order ID, or click Search with blank fields to display all online presales for your garage. To cancel a parker’s early entry charges, click Apply $0 Fee. To charge a fee based on current rates, click Apply Calculated Fee.
Parking Equipment Status #
At the bottom of the Garage Log is the Parking Equipment Status.
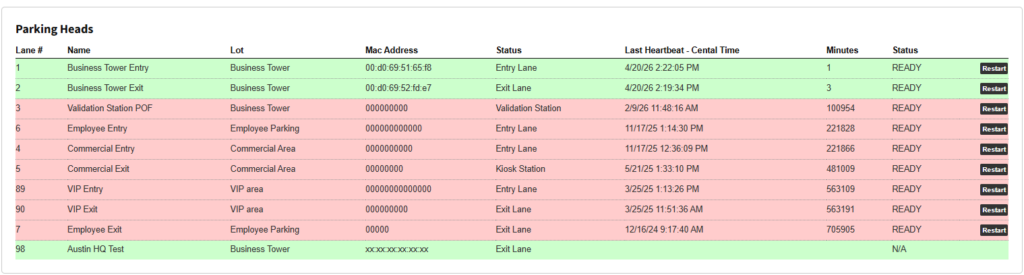
Each Parkonect product in a garage is listed here and reports to the Cloud server every 5 minutes.
- Green indicates a head is operational.
- Red indicates it is not.
If a piece of hardware stops communicating with the server for more than 10 minutes, email notifications are sent out every 10 minutes until the hardware is either back online or the notifications have been turned off.
Presale Log #
Check the article on Presale Log for a full disclosure of this section.